프로메테우스 그라파나 설정이 어느정도 되었다는 가정하에 진행이 가능합니다. 설정이 안되었다면 아래 글을 참고 해주세요..
Prometheus 와 Grafana, Node Exporter , Mysqld Exporter , RabbitMQ Exporter 환경 구축 (1/2)
Prometheus 와 Grafana, Node Exporter , Mysqld Exporter , RabbitMQ Exporter 환경 구축 (1/2)
모니터링 환경 구축 구축 배경 서버 상태, Rabbit MQ 상태, Mysql 상태를 실시간으로 확인할 수 있는 환경을 구축하고 싶다는 생각은 계속 해왔다. 개발서버의 경우 Proxmox로 구성되어 있어 언제든지
god-logger.tistory.com
Prometheus 와 Grafana, Node Exporter , Mysqld Exporter , RabbitMQ Exporter 환경 구축 (2/2)
Prometheus 와 Grafana, Node Exporter , Mysqld Exporter , RabbitMQ Exporter 환경 구축 (2/2)
그라파나 세팅 이전 프로메테우스와 익스포터 설정은 아래의 링크에서 확인할 수 있다. Prometheus 와 Grafana, Node Exporter , Mysqld Exporter , RabbitMQ Exporter 환경 구축 (1/2) Prometheus 와 Grafana, Node Exporter , Mys
god-logger.tistory.com
prom-client 란?
prom-client는 Node.js 애플리케이션에서 Prometheus 메트릭을 수집하고 노출하는 데 사용된다. 이를 통해 Prometheus 모니터링 시스템이 해당 애플리케이션의 상태를 모니터링할 수 있다.
prom-client는 Prometheus 커뮤니티에서 만든 비공식 클라이언트 라이브러리이지만 이 라이브러리는 널리 사용되고 있으며, 프로메테우스 공식 문서에서도 이 라이브러리가 링크되어 있다.

해당 라이브러리를 통해 Node.js 프로그램의 기본 metric 정보를 export 할 수 있는데, 이에 더불어 커스텀하게 원하는 정보를 추가할 수 있어 실제 적용하는 과정에서 기록하기 위해 작성한다.
아쉽게도 직접 작성한 코드가 공개되면 안되기에 최대한 예제로써 남겨본다. 실제 구동하려면 상황에 맞게 수정이 필요하다.
프로메테우스 사용을 위해 코드 내부 수정
우선 진행중인 프로젝트 내에 prom-client 를 설치한다.
npm i prom-client
// 또는
yarn add prom-clienthttps://www.npmjs.com/package/prom-client
prom-client
Client for prometheus. Latest version: 15.1.1, last published: 10 days ago. Start using prom-client in your project by running `npm i prom-client`. There are 1799 other projects in the npm registry using prom-client.
www.npmjs.com
websocket server 예시
import { WebSocket, WebSocketServer } from "ws";

// Counter : 시간이 지남에 따라 증가하는 누적 수
// Gauge : 특정 시점에 수량 파악
import { Gauge, Counter } from "prom-client";

// 접속자 수를 파악하기 위한 Gauge
const onlineUsers = new Gauge({
  name: "online_user_counter",
  help: "The number of users online",
  labelNames: ["type"],
});

// 5초마다 메세지 수량을 파악하기 위한 Gauge
const messageCount = new Gauge({
  name: "message_counter",
  help: "message_counter",
  labelNames: ["message"],
});

// 인터벌이 돌때마다 초기화하고 새로 확인하기 위해 생성한 맵
const messageCountManager = new Map();

const wsRun = () => {

    // 웹소켓 객체 생성
    const wsServer = new WebSocketServer({
        port: 18888,
        perMessageDeflate: {
          zlibDeflateOptions: {
            // See zlib defaults.
            chunkSize: 1024,
            memLevel: 7,
            level: 3,
          },
          zlibInflateOptions: {
            chunkSize: 10 * 1024,
          },
          // Other options settable:
          clientNoContextTakeover: true,
          serverNoContextTakeover: true,
          serverMaxWindowBits: 10,
          concurrencyLimit: 10,
          threshold: 1024,
        },
      });

    const increaseMessageCount = (type: string) => {
        // 맵에 카운트 정보 삽입
        messageCountManager.set(type, (messageCountManager.get(type) || 0) + 1);
    };

    wsServer.on("connection",(ws: WebSocket, req: IncomingMessage) => {
         ws.on("message", (data) => {
          const { type, message } = JSON.parse(data.toString());

          //
          increaseMessageCount(type);

          // 별도로 이벤트에 대해 처리하는 콜백, 상황에 맞게 구현
          eventsCallbackManager({ type, message, req, wsServer });
        });

        ws.on("close", (code, reason) => {
          // 정상 종료 처리 구간
        });

        // 그외 코드는 필요에 따라 처리
    });

    return wsServer;
}


// 해당 타입 키값은, 웹소켓에 메세지 포멧에 따라 맞추자.
const exportTarget = {
  example1: "example1",
  example2: "example2",
  example3: "example3",
  example4: "example4",
};

const exportTargetKeys = Object.keys(exportTarget);

interval = setInterval(async () => {
	// 메세지 카운트 Gauge에 각 키별로 0 값을 넣어 줌
    exportTargetKeys.forEach((key: string) => {
      messageCount.set({ message: key }, 0);
    });

	// 카운터매니저에서 뭔가 쌓였다면, 메세지 카운터 Gauge에 반영해줌
    if (messageCountManager.size != 0) {

      messageCountManager.forEach((cnt: number, key: string) => {
        messageCount.set({ message: key }, cnt);
      });
    }

    messageCountManager.clear();

}, 5000);

export { wsRun }
express 기준 router 예시
import express from "express";
import { register } from "prom-client";

const testRouter = express.Router();

testRouter.get("/metrics", async (req, res) => {
  req.headers["content-type"] = register.contentType;
  res.end(await register.metrics());
});

export {testRouter}아래와 같이 endpoint 구간을 구성해주면 된다. /metrics 라는 이름으로 했다.
express index.ts 예시
import express, { Express } from "express";
import helmet from "helmet";
import bodyParser from "body-parser";
import cors from "cors";
import { wsRun, wss } from "../ws/WebSocketServer.js";
import { port } from "./constants.js";
import { testRouter } from "./routes/testRoute.js";

import { collectDefaultMetrics } from "prom-client";
collectDefaultMetrics({ gcDurationBuckets: [0.001, 0.01, 0.1, 1, 2, 5] });

const app: Express = express();
wsRun(hostInfo); // webSocket Server Run

app.disable("x-powered-by");

const allowedOrigins = [
  "http://local.test.kr",
  "https://dev.test.kr"
];

app.use(
  cors({
    origin: function (origin, callback) {
      if (!origin || allowedOrigins.indexOf(origin) !== -1) {
        callback(null, true);
      } else {
        callback(new Error("Not allowed by CORS"));
      }
    },
    credentials: true,
  })
);

app.use((_req, res, next) => {
  res.set("Cache-Control", "no-store");
  next();
});
app.use(helmet());
app.use(bodyParser.urlencoded({ extended: true }));
app.use(bodyParser.json());


app.use("/", testRouter);

let wsServer: WebSocketServer;

wsServer = wsRun();

app.listen(webServerPort, () => {
  //서버 구동 콜백
});
프로메테우스 설정 yml 수정
prometheus.yml
global:
  scrape_interval: 15s
  evaluation_interval: 15s

scrape_configs:

  - job_name: 'websocket_server_exporter'
    metrics_path: /metrics
    static_configs:
      - targets: ['ws.testServer.kr']

// scrape_configs 에 job 하나를 추가해준다.
// targets 에는 서버 주소를 넣는다, 도메인이 아닌 IP:PORT라면 그렇게 입력한다.실행 후 확인
프로메테우스 Status -> targets 에 보면 정상적으로 metric

정상적으로 올라온 걸 확인할 수 있다.
그라파나를 통한 시각화
그라파나에 대해서는
베이스 기반 삼을 대시보드인 NodeJS Application Dashboard 이다.
https://grafana.com/grafana/dashboards/11159-nodejs-application-dashboard/
NodeJS Application Dashboard | Grafana Labs
Thank you! Your message has been received!
grafana.com

일단 기본 export 된 메트릭으로는 위에 나온 정보들이 다 나오긴 한다.
그라파나
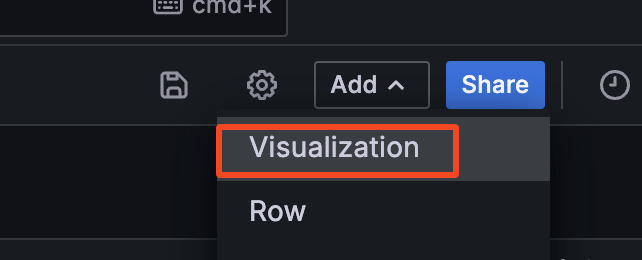
웹소켓 메세지 수신현황을 위해 add - visualization 을 눌러 panel을 추가해보자.

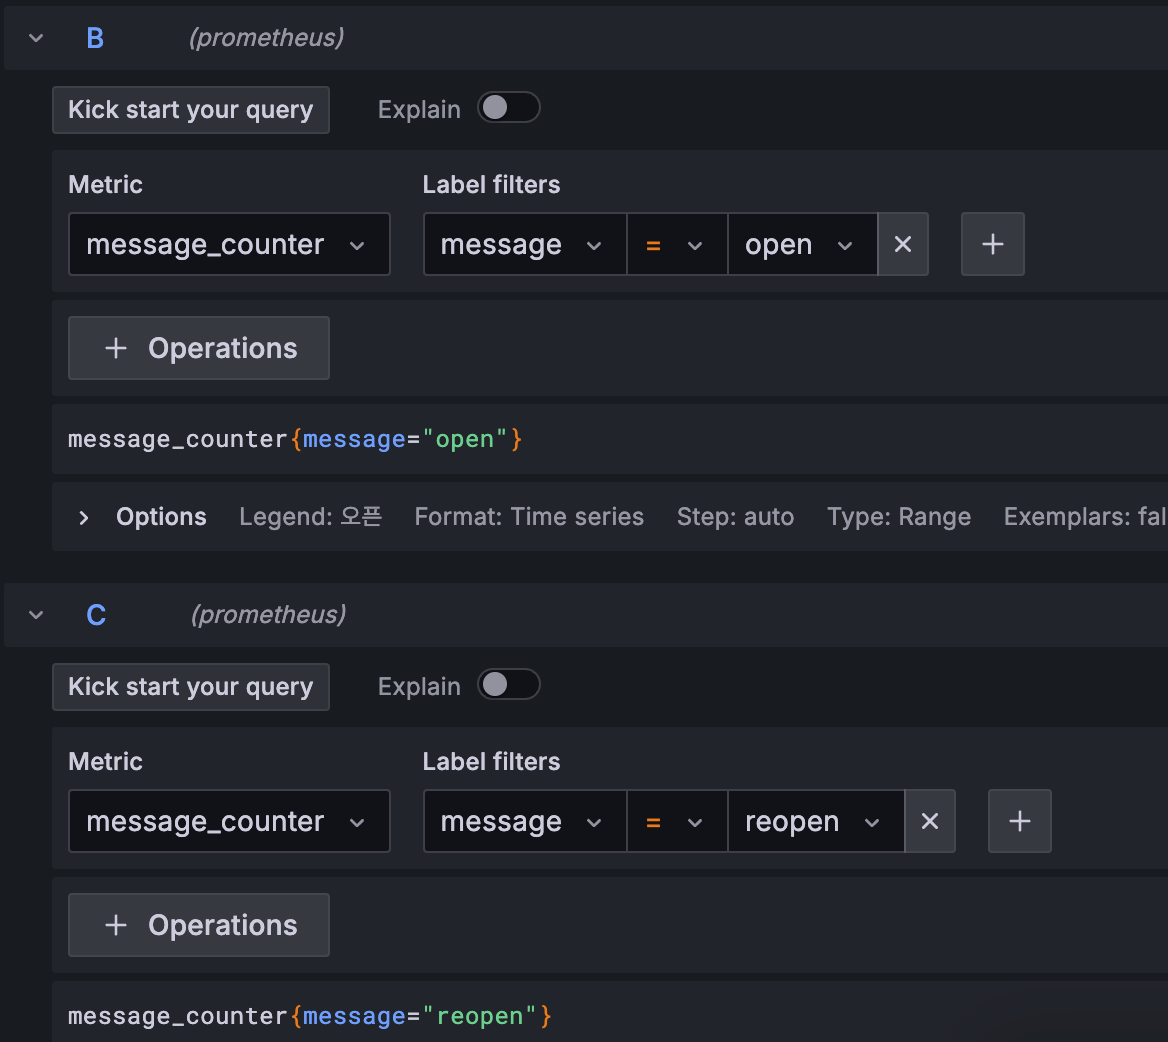
아래 사진과 같이 쿼리를 추가해준다.
example1, example2 로 코드상엔 표시했지만, 각 환경이나 포멧에 따라 구분값을 주었을 것이다.
메트릭 : message_counter , Label은 message로 지정했다. 해당 값이 웹소켓 메세지 구분값으로 매핑시켜주면 된다.
아래 예시 사진이다.

구분 수만큼 만들어주면 된다. run query를 눌러주면 미리보기가 바로 가능하다.

5초마다 집계 반영인 이유는 코드상에 interval을 5000마다 수행하도록 구현했기 때문이다. 개인적으론 5초안에 얼마나 쌓이고 싶나 확인하고 싶어 이렇게 했지만, 이 부분은 구현하기 나름이기에 정답은 없다.
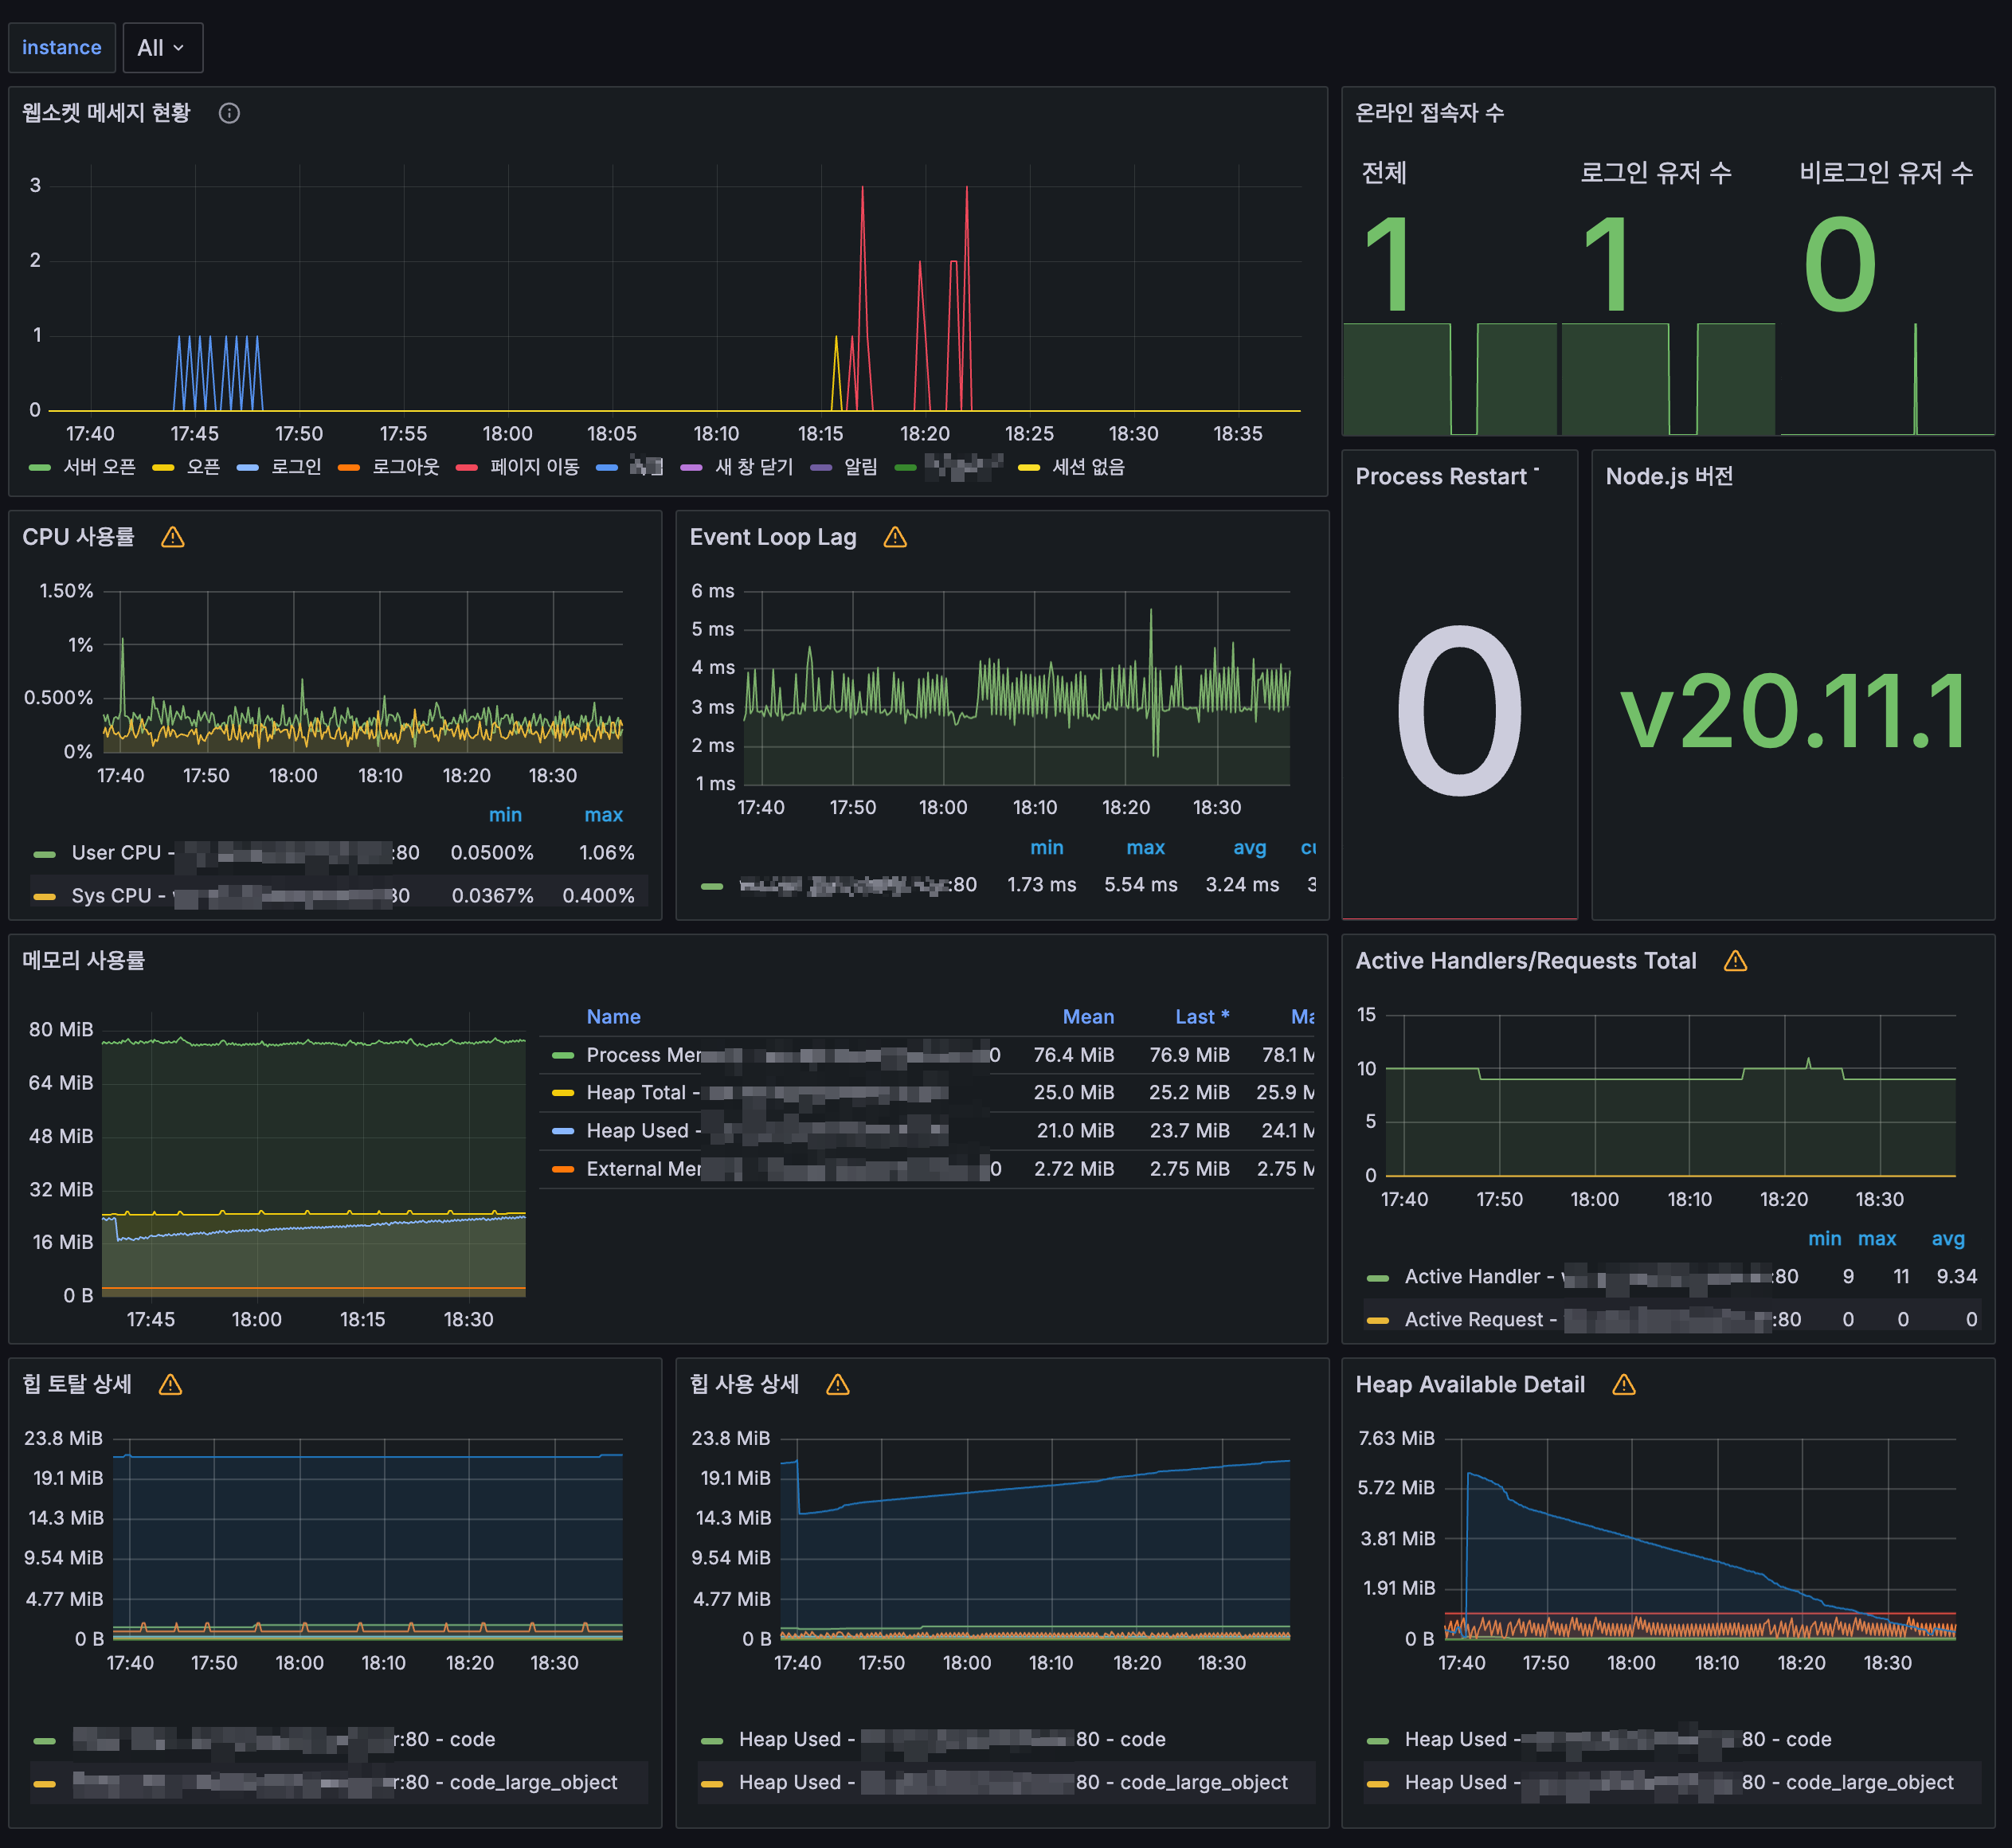
그렇게 추가한 Panel 을 보면 아래와 같이 원하는 위치에 배치해보자.

웹소켓 메세지 현황 잘 나오는걸 확인할 수 있다.
웹소켓 메세지 현황외에도 온라인 접속자 수 등을 추가해 해봤는데 잘 나온다.
'운영체제 및 서버 > Linux' 카테고리의 다른 글
| Ubuntu 22.04 UFW 방화벽 설정 (0) | 2024.08.30 |
|---|---|
| 우분투 리눅스 ssh / sshd 설치 및 세팅 (0) | 2024.04.09 |
| Prometheus 와 Grafana, Node Exporter , Mysqld Exporter , RabbitMQ Exporter 환경 구축 (2/2) (0) | 2024.04.03 |
| Prometheus 와 Grafana, Node Exporter , Mysqld Exporter , RabbitMQ Exporter 환경 구축 (1/2) (1) | 2024.04.02 |
프로메테우스 그라파나 설정이 어느정도 되었다는 가정하에 진행이 가능합니다. 설정이 안되었다면 아래 글을 참고 해주세요..
Prometheus 와 Grafana, Node Exporter , Mysqld Exporter , RabbitMQ Exporter 환경 구축 (1/2)
Prometheus 와 Grafana, Node Exporter , Mysqld Exporter , RabbitMQ Exporter 환경 구축 (1/2)
모니터링 환경 구축 구축 배경 서버 상태, Rabbit MQ 상태, Mysql 상태를 실시간으로 확인할 수 있는 환경을 구축하고 싶다는 생각은 계속 해왔다. 개발서버의 경우 Proxmox로 구성되어 있어 언제든지
god-logger.tistory.com
Prometheus 와 Grafana, Node Exporter , Mysqld Exporter , RabbitMQ Exporter 환경 구축 (2/2)
Prometheus 와 Grafana, Node Exporter , Mysqld Exporter , RabbitMQ Exporter 환경 구축 (2/2)
그라파나 세팅 이전 프로메테우스와 익스포터 설정은 아래의 링크에서 확인할 수 있다. Prometheus 와 Grafana, Node Exporter , Mysqld Exporter , RabbitMQ Exporter 환경 구축 (1/2) Prometheus 와 Grafana, Node Exporter , Mys
god-logger.tistory.com
prom-client 란?
prom-client는 Node.js 애플리케이션에서 Prometheus 메트릭을 수집하고 노출하는 데 사용된다. 이를 통해 Prometheus 모니터링 시스템이 해당 애플리케이션의 상태를 모니터링할 수 있다.
prom-client는 Prometheus 커뮤니티에서 만든 비공식 클라이언트 라이브러리이지만 이 라이브러리는 널리 사용되고 있으며, 프로메테우스 공식 문서에서도 이 라이브러리가 링크되어 있다.

해당 라이브러리를 통해 Node.js 프로그램의 기본 metric 정보를 export 할 수 있는데, 이에 더불어 커스텀하게 원하는 정보를 추가할 수 있어 실제 적용하는 과정에서 기록하기 위해 작성한다.
아쉽게도 직접 작성한 코드가 공개되면 안되기에 최대한 예제로써 남겨본다. 실제 구동하려면 상황에 맞게 수정이 필요하다.
프로메테우스 사용을 위해 코드 내부 수정
우선 진행중인 프로젝트 내에 prom-client 를 설치한다.
npm i prom-client
// 또는
yarn add prom-client
https://www.npmjs.com/package/prom-client
prom-client
Client for prometheus. Latest version: 15.1.1, last published: 10 days ago. Start using prom-client in your project by running `npm i prom-client`. There are 1799 other projects in the npm registry using prom-client.
www.npmjs.com
websocket server 예시
import { WebSocket, WebSocketServer } from "ws";

// Counter : 시간이 지남에 따라 증가하는 누적 수
// Gauge : 특정 시점에 수량 파악
import { Gauge, Counter } from "prom-client";

// 접속자 수를 파악하기 위한 Gauge
const onlineUsers = new Gauge({
  name: "online_user_counter",
  help: "The number of users online",
  labelNames: ["type"],
});

// 5초마다 메세지 수량을 파악하기 위한 Gauge
const messageCount = new Gauge({
  name: "message_counter",
  help: "message_counter",
  labelNames: ["message"],
});

// 인터벌이 돌때마다 초기화하고 새로 확인하기 위해 생성한 맵
const messageCountManager = new Map();

const wsRun = () => {

    // 웹소켓 객체 생성
    const wsServer = new WebSocketServer({
        port: 18888,
        perMessageDeflate: {
          zlibDeflateOptions: {
            // See zlib defaults.
            chunkSize: 1024,
            memLevel: 7,
            level: 3,
          },
          zlibInflateOptions: {
            chunkSize: 10 * 1024,
          },
          // Other options settable:
          clientNoContextTakeover: true,
          serverNoContextTakeover: true,
          serverMaxWindowBits: 10,
          concurrencyLimit: 10,
          threshold: 1024,
        },
      });

    const increaseMessageCount = (type: string) => {
        // 맵에 카운트 정보 삽입
        messageCountManager.set(type, (messageCountManager.get(type) || 0) + 1);
    };

    wsServer.on("connection",(ws: WebSocket, req: IncomingMessage) => {
         ws.on("message", (data) => {
          const { type, message } = JSON.parse(data.toString());

          //
          increaseMessageCount(type);

          // 별도로 이벤트에 대해 처리하는 콜백, 상황에 맞게 구현
          eventsCallbackManager({ type, message, req, wsServer });
        });

        ws.on("close", (code, reason) => {
          // 정상 종료 처리 구간
        });

        // 그외 코드는 필요에 따라 처리
    });

    return wsServer;
}


// 해당 타입 키값은, 웹소켓에 메세지 포멧에 따라 맞추자.
const exportTarget = {
  example1: "example1",
  example2: "example2",
  example3: "example3",
  example4: "example4",
};

const exportTargetKeys = Object.keys(exportTarget);

interval = setInterval(async () => {
	// 메세지 카운트 Gauge에 각 키별로 0 값을 넣어 줌
    exportTargetKeys.forEach((key: string) => {
      messageCount.set({ message: key }, 0);
    });

	// 카운터매니저에서 뭔가 쌓였다면, 메세지 카운터 Gauge에 반영해줌
    if (messageCountManager.size != 0) {

      messageCountManager.forEach((cnt: number, key: string) => {
        messageCount.set({ message: key }, cnt);
      });
    }

    messageCountManager.clear();

}, 5000);

export { wsRun }
express 기준 router 예시
import express from "express";
import { register } from "prom-client";

const testRouter = express.Router();

testRouter.get("/metrics", async (req, res) => {
  req.headers["content-type"] = register.contentType;
  res.end(await register.metrics());
});

export {testRouter}
아래와 같이 endpoint 구간을 구성해주면 된다. /metrics 라는 이름으로 했다.
express index.ts 예시
import express, { Express } from "express";
import helmet from "helmet";
import bodyParser from "body-parser";
import cors from "cors";
import { wsRun, wss } from "../ws/WebSocketServer.js";
import { port } from "./constants.js";
import { testRouter } from "./routes/testRoute.js";

import { collectDefaultMetrics } from "prom-client";
collectDefaultMetrics({ gcDurationBuckets: [0.001, 0.01, 0.1, 1, 2, 5] });

const app: Express = express();
wsRun(hostInfo); // webSocket Server Run

app.disable("x-powered-by");

const allowedOrigins = [
  "http://local.test.kr",
  "https://dev.test.kr"
];

app.use(
  cors({
    origin: function (origin, callback) {
      if (!origin || allowedOrigins.indexOf(origin) !== -1) {
        callback(null, true);
      } else {
        callback(new Error("Not allowed by CORS"));
      }
    },
    credentials: true,
  })
);

app.use((_req, res, next) => {
  res.set("Cache-Control", "no-store");
  next();
});
app.use(helmet());
app.use(bodyParser.urlencoded({ extended: true }));
app.use(bodyParser.json());


app.use("/", testRouter);

let wsServer: WebSocketServer;

wsServer = wsRun();

app.listen(webServerPort, () => {
  //서버 구동 콜백
});프로메테우스 설정 yml 수정
prometheus.yml
global:
  scrape_interval: 15s
  evaluation_interval: 15s

scrape_configs:

  - job_name: 'websocket_server_exporter'
    metrics_path: /metrics
    static_configs:
      - targets: ['ws.testServer.kr']

// scrape_configs 에 job 하나를 추가해준다.
// targets 에는 서버 주소를 넣는다, 도메인이 아닌 IP:PORT라면 그렇게 입력한다.
실행 후 확인
프로메테우스 Status -> targets 에 보면 정상적으로 metric

정상적으로 올라온 걸 확인할 수 있다.
그라파나를 통한 시각화
그라파나에 대해서는
베이스 기반 삼을 대시보드인 NodeJS Application Dashboard 이다.
https://grafana.com/grafana/dashboards/11159-nodejs-application-dashboard/
NodeJS Application Dashboard | Grafana Labs
Thank you! Your message has been received!
grafana.com

일단 기본 export 된 메트릭으로는 위에 나온 정보들이 다 나오긴 한다.
그라파나
웹소켓 메세지 수신현황을 위해 add - visualization 을 눌러 panel을 추가해보자.

아래 사진과 같이 쿼리를 추가해준다.
example1, example2 로 코드상엔 표시했지만, 각 환경이나 포멧에 따라 구분값을 주었을 것이다.
메트릭 : message_counter , Label은 message로 지정했다. 해당 값이 웹소켓 메세지 구분값으로 매핑시켜주면 된다.
아래 예시 사진이다.

구분 수만큼 만들어주면 된다. run query를 눌러주면 미리보기가 바로 가능하다.

5초마다 집계 반영인 이유는 코드상에 interval을 5000마다 수행하도록 구현했기 때문이다. 개인적으론 5초안에 얼마나 쌓이고 싶나 확인하고 싶어 이렇게 했지만, 이 부분은 구현하기 나름이기에 정답은 없다.
그렇게 추가한 Panel 을 보면 아래와 같이 원하는 위치에 배치해보자.

웹소켓 메세지 현황 잘 나오는걸 확인할 수 있다.
웹소켓 메세지 현황외에도 온라인 접속자 수 등을 추가해 해봤는데 잘 나온다.
'운영체제 및 서버 > Linux' 카테고리의 다른 글
| Ubuntu 22.04 UFW 방화벽 설정 (0) | 2024.08.30 |
|---|---|
| 우분투 리눅스 ssh / sshd 설치 및 세팅 (0) | 2024.04.09 |
| Prometheus 와 Grafana, Node Exporter , Mysqld Exporter , RabbitMQ Exporter 환경 구축 (2/2) (0) | 2024.04.03 |
| Prometheus 와 Grafana, Node Exporter , Mysqld Exporter , RabbitMQ Exporter 환경 구축 (1/2) (1) | 2024.04.02 |
